

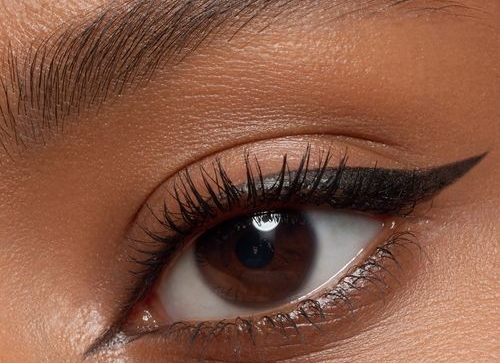
There is something about a well-drawn winged eyeliner that makes a beauty look feel complete. Whether you are heading to work, attending a wedding or going out with friends, a little flick at the corner of your eyes can make a difference. The only problem is getting both eyes to look the same. One wing may turn out perfectly, while the other seems to have a mind of its own.
If you have ever wiped off your eyeliner several times because the wings refused to match, you are not alone. The good news is that you do not need to be a professional makeup artist to get the look right. With a few simple tricks and some practice, you can create a neat winged eyeliner without the stress.
- Start with a clean base
Before reaching for your eyeliner, make sure your eyelids are clean and dry. Excess oil can cause eyeliner to smudge or transfer onto the upper part of your eyelid.
Apply a small amount of eyeshadow primer or concealer, then set it lightly with powder. This gives your eyeliner a smoother base and helps it stay in place for longer.
- Use tape for a sharp wing
If drawing a straight line feels like a challenge, clear makeup tape can help. Place a small piece at the outer corner of your eye, angling it towards the end of your eyebrow. Use the edge as a guide when drawing your wing.
Remove the tape gently once the eyeliner has dried. You should have a cleaner, sharper finish with less effort.
If you do not have makeup tape, a small piece of paper held against the outer corner can also serve as a guide.
- Try the dot method
Drawing one long line across your eyelid can be intimidating, especially if your hand is not steady. Instead, make a few small dots along your upper lash line, starting from the inner corner and moving outwards.
Connect the dots with short, gentle strokes. This gives you more control over the thickness and direction of your eyeliner.
For the wing, draw a short line from the outer corner towards the end of your eyebrow, then connect the tip back to the lash line to create a small triangle. Fill it in neatly.
- Keep both wings even
One of the biggest challenges with winged eyeliner is achieving symmetry. A useful trick is to start by marking where you want each wing to end before filling either one in.
Look straight into a mirror with your eyes open. This helps you see how the wings will look when you are not closing or stretching your eyelids.
Build the shape gradually, alternating between both eyes rather than completing one eye before starting the other. Small adjustments are easier to make before the eyeliner becomes too thick.
Remember, your eyes are not perfectly identical, so your wings do not have to be exact copies. Aim for a balanced look instead.
- Choose the right eyeliner
The type of eyeliner you use can make the process easier or more difficult.
Pencil eyeliner: Best for beginners who prefer a softer, slightly smudged look. It is easy to control and correct.
Liquid eyeliner: Ideal for creating a precise, dramatic wing. However, it may require a steadier hand.
Gel eyeliner: Offers good control and can create anything from a subtle flick to a bold cat eye. Apply it with a fine angled brush.
If you are just learning, start with a pencil or felt-tip eyeliner before moving on to a liquid formula.
- Work with your eye shape
Not every winged eyeliner style looks the same on every eye, and that is perfectly fine.
For hooded eyes, keep your eyes open while mapping out the wing. A shape that looks straight when your eyes are open may appear different when they are closed. A thin line along the lashes with a carefully positioned flick can work beautifully.
For round eyes, extend the wing slightly outwards to create a more elongated appearance.
For almond-shaped eyes, follow the natural direction of your upper lash line and extend it into a flick that suits your preferred style.
For smaller eyes, a thin line with a short wing can define the eyes without making the eyeliner look too heavy.
The trick is to work with your natural eye shape rather than trying to copy every eyeliner trend you see online.
- Fix mistakes without starting again
A little mistake does not mean you have to remove all your makeup and begin again. Keep a cotton bud and a small amount of micellar water nearby.
Dip the cotton bud into the remover and carefully clean up uneven edges. For a sharper finish, use a small, flat brush with a little concealer to tidy the area beneath the wing.
Allow liquid eyeliner to dry before correcting it to avoid spreading the product across your eyelid.
- Use your lower lash line as a guide
The direction of your lower lash line can help you decide where your wing should point. Imagine extending that line upwards towards the end of your eyebrow. This gives you a natural starting point for your flick.
However, avoid drawing the wing too far upwards if you prefer a softer look. A slight outward angle can be just as flattering, depending on your eye shape and the makeup style you want.
- Set your eyeliner for longer wear
If your eyeliner tends to smudge throughout the day, consider using a waterproof formula. You can also press a little black or dark brown eyeshadow over a pencil liner to help set it.
Avoid applying too much eye cream directly before doing your eyeliner, as the extra moisture may affect how well the product stays in place.
Always remove your eyeliner gently before bed to keep the delicate skin around your eyes clean and comfortable.
- Practise makes a difference
Perfecting winged eyeliner takes patience. You may not get the shape right on your first attempt, but that does not mean you cannot master it. Try practising before your usual makeup routine, when you have enough time to make adjustments without rushing.
Start with a small flick and gradually experiment with thicker lines, longer wings and different finishes.
Most importantly, do not let the pressure to achieve perfectly matching wings spoil the fun of doing your makeup. Whether you prefer a subtle everyday flick or a bold cat eye, the best winged eyeliner is one that makes you feel confident