

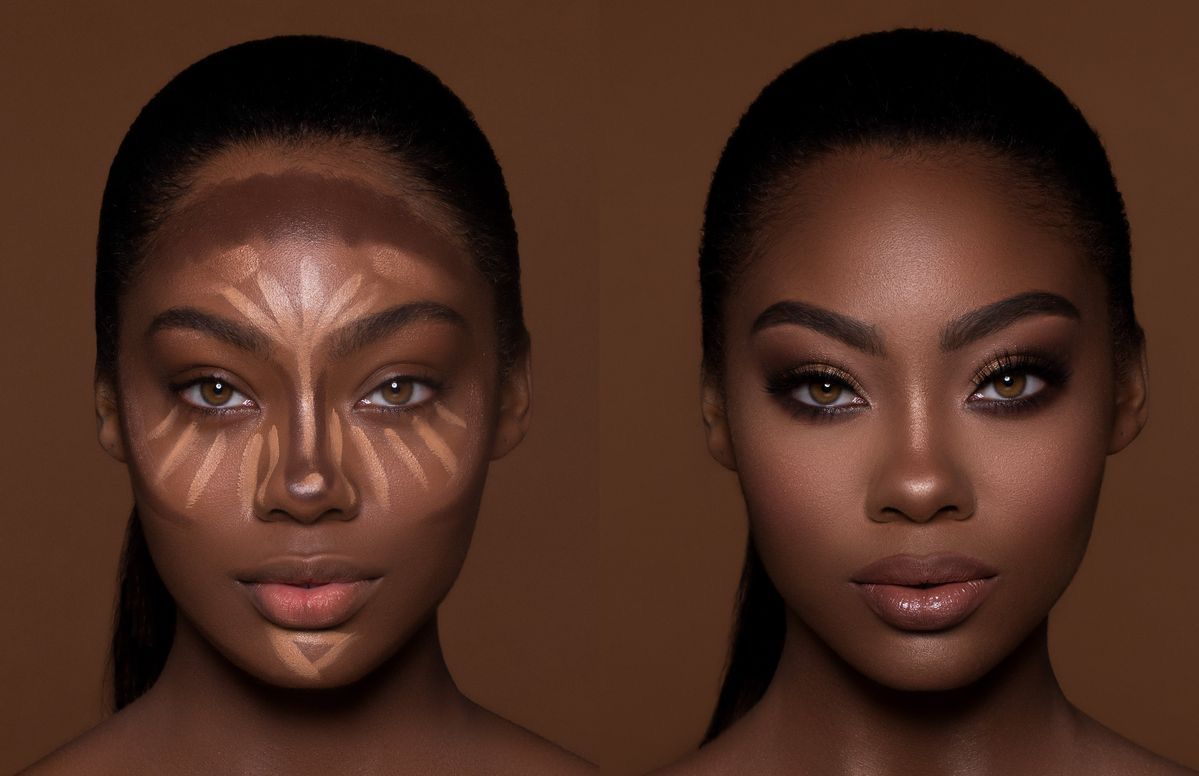
Contouring and highlighting can completely transform a makeup look. When done correctly, they can add definition, enhance your natural features and create a beautifully balanced finish. However, the key is knowing where to apply each product and, most importantly, how much to use.
Contouring is designed to create the illusion of shadows, helping to define areas such as the cheekbones, jawline and nose. Highlighting does the opposite. It draws light to the high points of the face, making features appear lifted and more prominent.
- Start with the right shade
One of the most common mistakes with contouring is choosing a shade that is too dark or too warm. Your contour should generally be a few shades deeper than your natural skin tone and should resemble a natural shadow. For a softer finish, choose a neutral or slightly cool-toned shade rather than a product that looks noticeably orange.
Your highlighter should complement your complexion. Champagne and gold tones can look beautiful on deeper skin tones, while soft gold, peach and pearl shades can work well across lighter and medium complexions. The most important thing is that the shade blends naturally with your skin.
- Know where to contour
For the cheeks, apply your contour just beneath the cheekbone, starting near the ear and blending towards the centre of the face. Avoid taking the product too close to the mouth, as this can make the face appear drawn.
Along the jawline, a small amount of contour can add definition. If you are contouring the nose, use a small brush to apply two very fine lines along the sides rather than drawing thick stripes.
The forehead can also be lightly contoured around the hairline, particularly if you want to create more balance between the forehead and the rest of your face.
- Highlight the high points
Highlighter should be applied to the areas where light naturally catches the face. These usually include the tops of the cheekbones, the bridge of the nose, the centre of the forehead, the cupid’s bow and the inner corners of the eyes.
You can also place a small amount on the centre of the chin. The trick is to use a light hand. Too much highlighter can make the skin look overly shiny rather than naturally radiant.
- Blend, blend and blend again
Good blending is what separates a polished contour from an obvious one. Whether you are using cream, liquid or powder products, take time to soften the edges so that there are no harsh lines.
A damp makeup sponge works particularly well for blending cream products, while a soft angled brush can help with powder contour. If you are using both cream and powder products, allow the first layer to settle before gently applying the second.
- Consider your face shape
Contouring does not have to follow a strict set of rules. Different face shapes benefit from different techniques.
If you have a round face, you may want to focus on adding definition beneath the cheekbones and along the jaw. For a longer face, keeping the contour softer and focusing on horizontal placement can help create balance. Those with a square face may prefer to soften the corners of the forehead and jaw.
The goal is not to change your face completely. It is to enhance the features you already have.
- Keep it natural
The most flattering contouring is often the one people cannot immediately see. Start with a small amount of product and build gradually. It is much easier to add more than to remove an overly heavy application.
Remember that lighting can also affect how your makeup looks. A contour that appears subtle in your bedroom mirror may look much stronger outdoors or under bright lights. Always check your makeup in natural light when possible.
With the right shades, careful placement and plenty of blending, contouring and highlighting can become an effortless part of your beauty routine. The aim is not perfection, but definition that enhances your natural features while still allowing your skin to look like skin.